Dance Floor Setup & Help
This is for staff & rental clients of Black Diamond dane floor systems. Please select the dance floor task for setup steps and troubleshooting tips
DANCE FLOOR SETUP & CARE INSTRUCTIONS
Dance Floor Setup Instructions
To ensure Black Diamond’s dance floors remain in excellent condition, please follow these care and maintenance guidelines:
- Proper Assembly and Disassembly:
Educate anyone that would be assembling the flooring the right and wrong way to take apart the flooring. Not only is it harder to do it the wrong way, but it will chip and break the vinyl and tile loops when done improperly which is not covered by warranty. See this video: Installation and Removal Video: Watch here: https://www.youtube.com/watch?v=pv7Zhb1fo14
(Disassembly instructions begin at 5:50 in the video, panel disassembly begins at 7:13, wrong way to remove is at 8:30)
- Cleaning:
Always clean the flooring before and after every use before you store them.
Day-to-Day Cleaning:
- Sweep and Mop: Regularly sweep and mop your floors to keep them clean. Doing this before and after events ensures the best results.
- Cleaning Solutions: Any all-purpose cleaner or no-wax kitchen floor cleaner will work well. Alternatively, you can use a mixture of water and ammonia (about a cup of ammonia to a gallon of water).
Recommended Cleaning Products:
- Daily Cleaner: Bona Luxury Vinyl Floor Cleaner is a great choice for everyday cleaning.
- Restoring Shine: Mop and Glo 3-in-1 can help restore the shine to your floors.
- Scuff Marks: Use a Mr. Clean Magic Eraser to remove scuff marks, but make sure to rinse well after use.
- Sticky Substances: Goo Be Gone is effective for removing sticky residues.
General Care:
- Stacking Panels: When stacking panels, place vinyl flooring to flooring and base to base to avoid scratches. When stacked correctly, it will resemble an Oreo cookie.
- Avoid Dragging: Avoid dragging furniture, chairs, decorations, rocks, or other items across your flooring, as sharp items can scratch the vinyl surface.
- Proper Storage:
Your vinyl dance floor is intended to for temporary use and should be stored in a temperature-controlled environment until the next event.
- Stack the panels ONLY with the vinyl top together then with the plastic bottoms together. The stack should look something like an Oreo cookie or sandwich when done properly.
- The bottom of your dance floor has feet that are intended to grab and hold to the subsurface they are placed on. This will ensure they do not walk when in use. They will also chip and mar the vinyl surface of another tile, so do not overlap them.
DANCE FLOOR SALES SCRIPT
BLACK DIAMOND DANCE FLOOR — SALES CALL SCRIPT
1. Opening (natural, not salesy)
“Before we wrap up, I wanted to share something exciting we just added for this season.
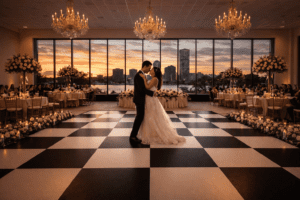
We now have a brand-new luxury black, white, and checkerboard dance floor in-house that completely transforms the look of the reception space and really anchors the dance floor energy.”
(Pause and let them react.)
2. Paint the visual + emotional value
“It’s a premium matte-finish floor—so it photographs beautifully, feels upscale in the room, and instantly creates that ‘wow’ moment when guests walk in.
Most of our couples who add a dance floor tell us it becomes one of the biggest visual focal points of the entire night… right next to the lighting and the packed dance floor itself.”
3. Guide toward the right size (consultative tone)
“Based on your guest count of [X], the size we usually recommend is:
- 18×18 for more intimate dancing
- 21×21 which is our most popular Boston wedding size
- 24×24 if you want that really full, high-energy dance floor look
My instinct for your wedding is the [recommended size] so everyone has room to dance comfortably without the floor feeling too large.”
4. Introduce pricing confidently (no hesitation)
“For booked couples, the investment for that size is typically around [price range], plus professional delivery and installation so everything is seamless on your wedding day.”
(Short pause — let them process.)
5. Present the limited-time introductory offer
“Because this is a brand-new addition for 2026, we’re offering our current couples a special introductory rate if it’s added by March 20th.
So this is honestly the best pricing we’ll ever have on the floor.”
6. Create gentle urgency using real scarcity
“We also only have enough panels to create:
- One large 30×30 checkerboard, or
- Two 21×21 solid floors on any given date.
So once a date locks in a floor size, that’s it for the night.”
(Pause.)
7. Soft close (assumptive but kind)
“Would you like me to:
A) add the [recommended size] to your design so you’re locked into the introductory rate,
or
B) send a quick visual with a couple size options to look over together?”
8. If they hesitate (reassurance response)
If price concern:
“Totally fair. Most couples who are on the fence choose the 21×21, because it gives the full luxury look without jumping to the larger gala pricing.
And since the introductory rate disappears after March 20th, this is the most cost-effective moment to add it.”
If unsure about size:
“No problem at all — I can map the exact floor size to your venue layout so you know it’ll feel perfect in the room.”
If they need to think:
“Of course. I’ll note your interest and hold the introductory pricing until March 20th.
Just send me a quick message and we can add it in under a minute.”
9. Close with excitement
“I’m excited about this one — the new floor with your lighting design is going to look incredible and really complete the room.”
END GOAL:
Confident, consultative, luxury tone.
Never pushy.
Always assumes the dance floor is part of the celebration.
DANCE FLOOR PANEL CALCULATOR


